How to Do Cherry and Watermelon Nails with Semilac Hybrid Polish
Master cherry and watermelon nails with easy step-by-step techniques, the right tools and Semilac shades that keep every detail crisp and vibrant.
Fruit motifs live or die on scale, and the single biggest mistake is painting them too big. Tiny cherries and a clean watermelon slice read as polished only when each element stays small and the edges stay sharp. This guide walks through cherry nails step by step: the dot and stem, the watermelon wedge, and how to keep every detail sharp from base to top coat. Grab your dotting tool and a thin liner, and we will go fruit by fruit!
Here is what this guide covers:
- which tools and shades give you the cleanest fruit accents
- how to paint cherries and a watermelon slice step by step
- which habits keep small details from smudging or bleeding
What you need for cherry and watermelon nails
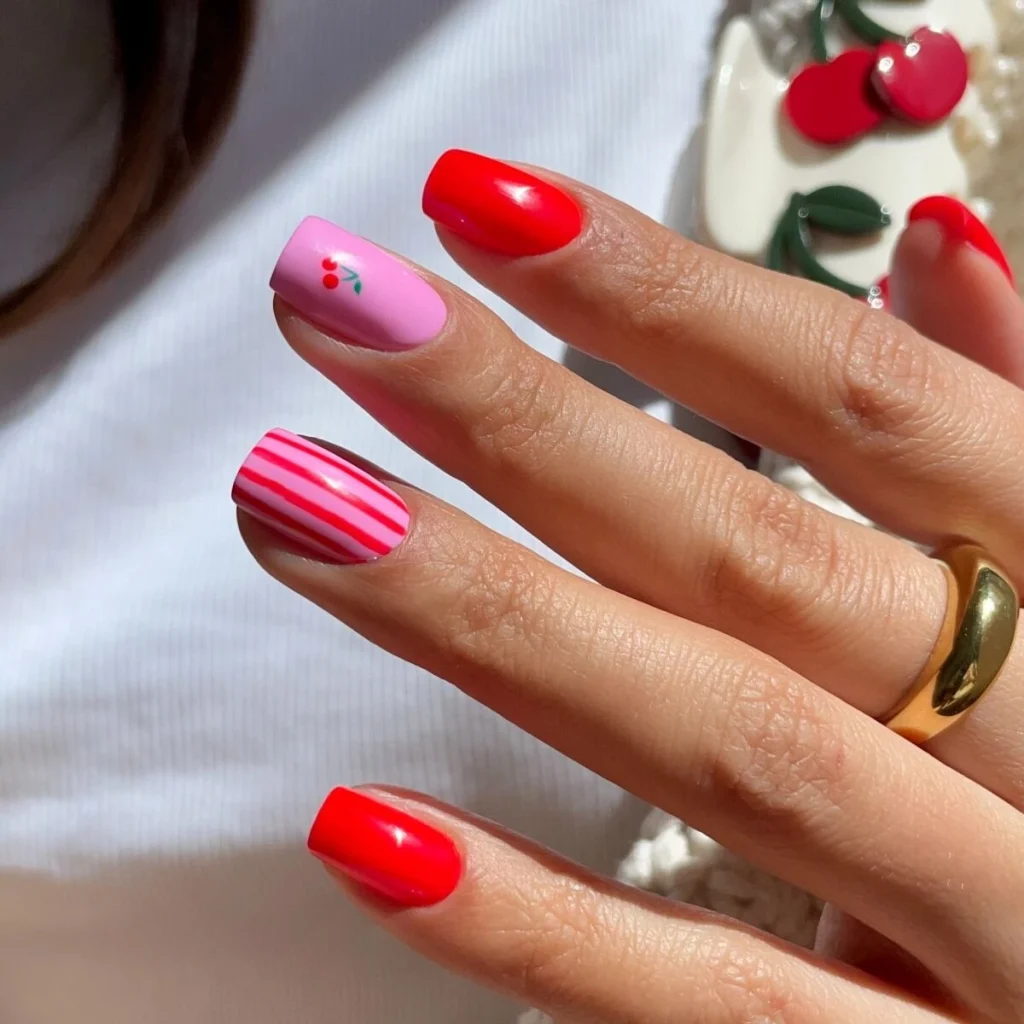
Three colors carry this whole design: a soft pink base, a true red for the fruit, and a bright pink to push the contrast. For the pink canvas, reach for Pink Blush 967. Build the cherry and watermelon nails flesh with Spicy Neon 981. A jolt of Electric Pink 043 covers the solid pink finger and warms up the watermelon rind.
For application, you want fine tools, not your regular brush. The fruit shapes are too small for a polish brush to handle cleanly. A dotting tool and a thin liner do the job that no standard brush can match.
The tools that make small fruit art easy:
- a dotting tool for round, even cherries and watermelon seeds
- a thin liner brush for stems and the green rind line
- a no-wipe top coat to seal art without dragging the colors
All three shades here are Semilac Hybrid Polish, so they cure hard and stay glossy under a lamp. In our experience, working with hybrid color rather than regular lacquer is what keeps the detail from chipping off within a day.
How to paint cherries step by step
Start on a fully cured pink base, because wet color underneath will smear the moment your dotting tool touches down. A single press that lifts straight up, rather than dragging, keeps each dot round instead of teardrop-shaped.
Paint each cherry in this order:
- Press two small red dots near the free edge, side by side, leaving a hair of space between them.
- Cure for the full lamp time so the dots set before you add the stems.
- Switch to a thin liner and pull two fine green stems up from the cherries into a soft V.
- Add a tiny white highlight on each cherry with the very tip of the liner for a glossy look.
Keep the cherries small, around a third of the nail at most. Oversized fruit is the fastest way to make the design read as a kids’ sticker instead of a clean accent. When in doubt, go smaller than feels right, because the cherry always looks larger once the stem and highlight are in place.
How to paint a watermelon slice step by step
The watermelon nail in this design is built as vertical pink and red stripes, which is easier to control than a curved wedge. Lay the bright pink flesh down first as one solid block, cure it, then add the rind and seeds on top. Building in that order stops the green and pink from bleeding into each other.
Run a thin green line along one edge for the rind, then a slightly thinner white line just inside it. Finish with three or four small seeds placed with your dotting tool, angled so they fan outward the way real seeds sit. Cure again before any top coat goes near them.
How to keep small details crisp
Thin layers and full curing between steps are the two habits that protect every small detail. A thick dot spreads as it sits, and a half-cured layer lifts when the next brush passes over it, so patience between stages does most of the work.
The other half is your top coat. Float a no-wipe top over the art instead of pressing the brush down, working in one direction so you never drag a seed or stem out of place. Most technicians find that a single confident pass beats three timid ones that disturb the design.
Pro tips for cute, clean fruit nails
The cleanest cherry and watermelon nails usually mix art and solid color rather than covering every finger. One cherry nail, one watermelon accent, and the rest in solid Electric Pink or red gives the hand balance and lets the detail stand out.
Wipe your liner brush on a lint-free pad between every stroke so old color does not muddy the next line. Our range of hybrid shades layers cleanly when each coat is thin, which is exactly what fine fruit art needs. These finished as durable Gel Nails that hold the artwork through everyday wear.
Frequently asked questions about cherry and watermelon nails
What is the easiest fruit design to start with?
Cherries are the best starting point because they are just two dots and a stem. Master the round dot first, and the watermelon slice will feel far less intimidating afterward.
Which brush works best for small details?
A dotting tool handles cherries and seeds, while a thin liner brush gives you the control for stems and rind lines. Those two tools cover almost every fruit design you will paint.
How do I keep details from smudging?
Cure fully between every layer and seal with a no-wipe top coat using one gentle pass. Smudging almost always traces back to a layer that was not set before the next step went on.